


Southwestern Taco Triangles
Perfect for New Years Day! Individual taco triangles.These little jewels will be a sure-fire hit with your football couch potatoes. Serve them warm with a dish of picante sauce and watch them disappear.
Ingredients:
1 pound ground chuck
1/2 cup onion, minced
2 tablespoons veg oil
1 can (16 ounces)Taco Bell refried beans
1-1/2 cups (6 ounces) shredded cheddar cheese
1 cup Pace picante sauce
1 can (4 ounces) diced jalapeno peppers, drained
2 packages (12 ounces each) wonton wrappers
Oil for deep-fat frying
Additional Picante sauce for dipping
Directions:
Saute` the onion in the oil and add the ground chuck. Cook just until done, do not brown. Add salt and pepper to taste and drain. Add the beans, cheese, picante sauce and
jalapenos. Cook and stir over low heat until the cheese is melted. Remove from heat; and when cool,
In the center of each wonton wrapper, place a level tablespoon full of the ground chuck mixture. Moisten all edges with a little beaten egg.. Fold each wonton in half, forming a sealed triangle.
Deep-fry in 375° degree oil, a few at a time, for 2-3 minutes or until golden brown. Drain on
paper towels. football couch potatoes. Yield: about 7-1/2 dozen.
Wednesday, December 31, 2008
Chocolate Cake Christmas Trees
 Chocolate cake Christmas Trees
I used a large foil roasting pan and cut holes about 2" round in the bottom in alternating rows, leaving 1-2 inches in between the holes. Then I turned it upside down and put cone shaped paper cooler cups in the holes to hold them upright during baking. You want the cups to be in the holes about 2/3 of the way down so they won't tip from being top heavy when pouring in the chocolate cake.
Chocolate Cake ( this is a very thin batter)
1 Cup Butter (2 Sticks) No substitutions.
6 TBS Cocoa ( I use Hershey's special blend with the dutch cocoa mix)
1 Cup Water
2 Cups Sugar
1 Tsp Baking Soda
1/ 2 Tsp Salt
2 Cups Flour
2 Eggs
1/2 Cup Sour Cream
Boil butter, cocoa and water. Stir in sugar. Remove from heat. Beat. Cool slightly.
Add flour and the rest of the ingredients. Beat.
Pour the batter ( which is very thin) into the cups and bake at 350 degree F. until a toothpick inserted in the center of the cake comes out clean. and the cake feels firm to the touch, 25-30 minutes
Let the cakes cool completely in the pan. When cakes are cool place them in the freezer for 3 hours then peel off the paper being careful not to tear off the tip of the tree. . Place cakes on a rack over a sheet pan lined with waxed paper and pour a white chocolate ganache` over them to frost.
White chocolate ganache`
melt 12 ounces of white chocolate or white chocolate chips with 2 cups heavy cream in a double boiler. take out 1 cup and set aside. Color the rest with a few drops of green paste food color. Pour the green ganache` over the trees letting the excess drip off onto the waxed paper. Then put the reserved white chocolate ganache` into a ziplock bag, cut off the tip of the corner and pipe a garland around each tree. Then stick on red hot candies and silver dragees to look like ornaments.
NOTES: You can also frost the trees in white and make green garlands and use M&M's or any kind of candy you desire to decorate your trees. These are great for kids parties, they love 'em!
Saturday, December 27, 2008
New Year's Day, Fast and Easy Strudel
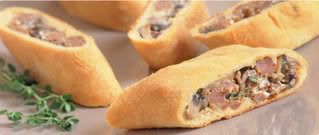 Here's a great finger food for the guys on New Year's day to munch on while watching the game.
Some condiments can be added for dipping such as picante sauce or salsa, hot mustard, mayo, or even a thick white gravy.
MUSHROOM SAUSAGE STRUDEL
1/2 lb. mild or hot ground pork sausage
1/2 lb. mushrooms, chopped
1/2 tsp. dried thyme, crumbled
1 tbsp. Dijon Mustard
1/4 cup Sour Cream
1 package (8 oz.) refrigerated crescent rolls
1.Preheat oven to 350°. Place rack in upper third of oven.
2.To make filling, in a medium nonstick skillet, sauté sausage over moderate heat, breaking up with a spatula until cooked through and crumbled. Drain off fat. Add mushrooms and thyme and sauté over high heat until all liquid has evaporated and mushrooms begin to brown, about 5 minutes. Remove from heat and stir in mustard and sour cream.
3.Remove half package of rolls and place on a lightly floured board. Press together at perforations to seal the dough together.
4.Spoon half the filling down the center of pastry. Fold pastry over and roll up. Crimp ends.
5.Transfer to an ungreased baking sheet, seam side down. Repeat with remaining filling and rolls.
6.Bake for 14 to 18 minutes or until golden. Remove from oven and cool slightly.
7.Transfer to cutting board and slice into 1-in. pieces.
Wednesday, December 17, 2008
Every cook, at some time, decides to make a pie. For me, the crust is the backbone of the pie, and for most cooks, it's the hardest to achieve.Pie crust was my nemesis for many years, until I finally decided I was going to get it right if it hair-lipped the governor!
Enter, the Pie Chef.! The, in my opinion," guru" of pie crusts. She has gotten themdown to a science and I'm gonna tell ya how to do it for a no-fail experience.She taught me that the exact ingredients are the mos timportant thing,and the next most important thing is to sift the flour before and after measuring it.Doing those two things will almost gar-awn-tee you'll get a perfect product every time.
So,we'll start with the crust. The most common, and the one my grandmother always made, was one with shortening (she used lard then, but Crisco is what most people use now. I like to use a mixture of the two and it can be purchased in most grocery stores. It will say, " a mixture of vegetable and animal fats".Whichever one you want to use is fine for this crust, plain flour ( my personal choice is Martha White) and iced water. Just those three ingredients.
Here are the measurements for one crust:
1 1/2 cups flour
1/2 cup Crisco
dash salt
3 tablespoons ice water
for a double crust:
2 1/4 cups flour
3/4 cup Crisco
dash salt
4 1/2 tablespoons ice water
for two crusts:
3 cups flour
1 cup Crisco
dash salt
6 tablespoons ice water
actually the "secret" to flaky crust is trapping the pieces of cold shortening between the layers of flour that have been moistened with iced water.To obtain that "flakiness" which is what we all desire, I suggest you chill the shortening before making the pie crust and use iced water..When I make pie crust I chill the shortening to get it hard enough to be cut into little pea-sized pieces, and cut it in with a food processor or a pastry cutter until the shortening is the size of peas.
Now don't laugh at this next instruction cause it works really well.( if you try it you'll see it does) I use a "sippy cup", the kind that has the little snap on lid that lets the liquid out slowly when a child drinks from it.( it works almost like a salt shaker) I measure the amount of water I'm using for ever how many crusts I'm making, and once I have the shortening cut into the flour, I sprinkle the required amount of water into that mix, tossing with a fork as I do so. Then I put it all in a ziplock bag and mash it together into a ball. Next I put it back into the fridge for about 5 minutes to make sure it's cold.( this keeps those little pea-sized pieces of shortening hard)Then I roll it out and put it in my pie pan, pop it into the freezer for 10 minutes and then bake as directed. The crust comes out flaky every time. I know this is a lot of pains to go to, but if you really want a flaky crust, it works! Try it sometime.
NOTES:
1. I always bake pies in the middle of my oven and I only use pyrex pie baking dishes, and the bottom crust is always nice and brown. But any pie pan will work. Pyrex just works better for me.
2. When I roll out a pie crust, I do so between two layers of plastic wrap. Then it's very easy to turn it into my pie plate and the plastic peels off easily once it's in there.
3. If, like me, you don't have kids..... try confiscating one of those "sippy cups" from a niece or nephew like I did LOL! You'll find it facilitates getting that iced water sprinkled in evenly and not having one big blob of dough that is wet and other parts that are bone dry.
4. The amount of water specified is just a guideline. The amount of humidity in the air will determine how much you really need. But the smaller the amount of water used, the flakier the crust will be.
HERE ARE THE AMOUNTS FOR A BUTTER CRUST, WHICH I FIND TASTE REALLY GOOD WHEN MAKING A FRUIT PIE.
AMOUNT FOR 1 CRUST
1 13 cups flour
1 stick cold butter
dash salt
2 2/3 tablespoons ice water
for a pie with a top crust:
2 cups flour
1 1/2 sticks cold butter
dash salt
4 tablespoons ice water
I use the butter frozen and put it in a food processor for ease of mixing, but you can do this by hand too. Cut the butter into six pieces and add to flour in processor. Pulse enough times to get the butter into pea-sized pieces. Then add required amount of iced water while pulsing again to mix. DON'T OVER MIX OR CRUST WILL BE TOUGH
Another really good crust that goes great with a pumpkin pie is made using whole wheat flour. Here are the amounts for it.
WHOLE WHEAT CRUST FOR PUMPKIN PIE
for 1 crust
1 1/2 cups whole wheat flour
1/2 cup Crisco
dash salt
3 tablespoons ice water
for 2 crusts, double all ingredients
Process as with other crusts
And,finally, the meringue (or calf slobbers, as my grandpa used to call them). There are so many different ways to make meringue that I'm only going to give you the way I make mine which always stay pretty after the pie is done. First, remember to put meringue on top of a hot filling, Next, remember to seal it to all edges of the crust. And last,cook it at 350 degrees for about 20-25 minutes until brown. Here are the ingredients:
MERINGUE
3-4 egg whites
1/2 teaspoon baking powder
1/4 teaspoon cream of tartar
dash of salt
3-4 tablespoons sugar for each white
Combine all ingredients except sugar and mix until frothy peaks form when beaters are lifted out of the whites.Add the sugar, one tablespoon at a time while beating until all is incorporated. Spread on top of pie and bake.
VOILA`, a beautiful, tasty, pie! and don't cut it until it's cold so the filling will be firm
Friday, December 12, 2008
The Riddle of the Runny Pie
Nothing can be more embarrassing than to make a beautiful custard pie and, when you cut into it, to discover the filling, that was just the right thickness when you poured it into the beautifully browned crust, has now turned into a runny liquid mess! You've made that pie a hundred times and are sure the ingredients were fresh and accurate. Well, my friend, you have been visited by the enzyme amylase thieves! These sneaky little culprits, who live in the yolks of eggs, have gobbled up all the starch in your pie.
Egg yolks must reach a temperature of over 140 degrees F or the thickening they provide actually reverses itself due to the enzyme amylase in them, which attacks the starch, unless it's deactivated by adequate heat. In other words, you must bring the custard to a boil to destroy these enzymes. I realize it's much easier to cook custard in a double boiler, which allows you to do other things at the same time because you don't have to stand over it to keep it from scorching. But you have to bring it to a boil and the double boiler will just not let you do that.
When I make a cream pie I put all but 1 cup of the milk that is required into a pot and let it start to heat up as I mix the sugar, egg yolks and cornstarch together. Then I add the cup of cold milk to the egg yolk mixture and, while whisking constantly, slowly pour that into the heating milk. I continue to stir with a whisk until the custard comes to a boil and is thick. Then I remove it from the heat and add the butter and flavoring and pour it into my already browned crust. I quickly beat the whites for the meringue and pour them on top of the hot filling, making sure it touches the crust all the way around. Then I bake the meringue at 350 degrees F. for 25-30 minutes or until nicely browned.
Tuesday, December 9, 2008
Do you FONDUE?
 Well, do you? Keeping the conversation flowing at any kind of gathering is sometimes the hardest thing for a host/hostess to achieve. There are always some guests, who just can't mingle with others, who stand like wallflowers on the sidelines of conversations. Nothing gets people talking and interacting better than a "fondue party" to keep the conversation rolling and even the shyest guest will feel at ease once they pick up a fondue fork. So if you're having a gathering of people, who aren't acquainted or find it hard to join in the fun, Fondue is the very best "ice breaker" there is. Do keep the "pot" full and have plenty of food to dip.
You can buy a fondue pot or two, or just set a heatproof bowl on a warming plate. You can cook tiny pieces of meat in broth, or just dip various foods in a great sauce or chocolate. The things you can do with fondue are limited only by the imagination of the hostess. Here are some basic fondue recipes that are sure to please and turn a dull party into a really fun way for people to get acquainted.
Parmesean Fondue
1 1/2 cups milk
2- 8 oz packages of Philadelphia cream cheese- cubed
1 1/2 c grated parmesan cheese
1/2 tsp garlic salt
Various foods suitable for dipping.
Don't use anything that will crumble or break off into the fondue. Use 1" cubes of french bread, cauliflower, boiled baby potatoes, celery, meatballs, little smokie sausages. Be sure everything is cut into bite-sized pieces for dipping. Have fondue forks available or use toothpicks to spear each piece of food.
In a pan, heat milk and cream cheese on low heat untill smooth (do NOT boil). Stir in parmesan cheese and garlic salt, and heat till smooth (do NOT boil). Transfer to a small crockpot, or fondue pot to serve.
This can be made a day prior to your party , and heated in the crockpot on low.
A great taste sensation is pieces of angel food cake or fruit dipped in a plain or flavored chocolate. Here are two delicious combinations.
White Chocolate/Amaretto fondue
for each pound of Kraft white chocolate, grated or Nestles white chocolate chips, use 1 cup heavy whipping cream and 1 tablespoon Amaretto liquor.
Mix liquor and cream in a double boiler over simmering, but not boiling, water. Add the chocolate and Stir until all chocolate is melted. Transfer to a fondue pot and surround with bite-sized pieces of angel food cake, bananas, strawberries, pineapple, cantelope or other suitable fruit.
Dark chocolate/orange flavored fondue
For each pound of Kraft chocolate bark, grated or Nestles chocolate chips, use 1 cup heavy whipping cream and 1 tablespoon Grand Mariner liquor.
Mix liquor and cream in a double boiler over simmering, but not boiling, water. Add the chocolate and stir until all chocolate is melted. Transfer to a fondue pot and surround with bite-sized pieces of angel food cake, bananas, strawberries, pineapple, cantelope or other suitable fruit.
NOTE: more liquor may be used to taste or omitted altogether if desired.
Saturday, December 6, 2008
THE SMILE
A
but gives much. It
enriches those who receive,
without making poorer those who
give. It takes but a moment but the memory
of it sometimes lasts forever. None is so rich or
mighty that he can get along without it, and none is so
poor but that he can not be made rich by it. A smile creates
happiness in the home, fosters good will in business, and is the
countersign of friendship. It brings rest to the weary, cheer to the dis-
couraged, sunshine to the sad, and it is nature's antidote for trouble. Yet
it cannot be bought, begged, borrowed, or stolen. For it is something that is of
no value to anyone until
it is given away ~ Some
people are too tired to
give you a smile. Give
them one of yours, as
no one needs a smile so
much as he who has no
more to give.
smile
costs nothingbut gives much. It
enriches those who receive,
without making poorer those who
give. It takes but a moment but the memory
of it sometimes lasts forever. None is so rich or
mighty that he can get along without it, and none is so
poor but that he can not be made rich by it. A smile creates
happiness in the home, fosters good will in business, and is the
countersign of friendship. It brings rest to the weary, cheer to the dis-
couraged, sunshine to the sad, and it is nature's antidote for trouble. Yet
it cannot be bought, begged, borrowed, or stolen. For it is something that is of
no value to anyone until
it is given away ~ Some
people are too tired to
give you a smile. Give
them one of yours, as
no one needs a smile so
much as he who has no
more to give.
ppppppp
Wednesday, December 3, 2008
The Versatile Flour Sack
One of the most common things around the kitchen when I was growing up were flour sacks. We grew, and 'put up", everything we ate except for a few staples.
Every Saturday we went to town where the women shopped for the things they needed and the men gathered around the Courthouse "square" where they traded livestock and swapped stories while the kids played on the Courthouse lawn.
My grandmother bought 10 and 25 pound bags of flour that came packaged in large squares of gaily printed cotton fabric. When we got home, the flour was stored in a can in the pantry. The sack was then washed and used for many things, including clothes. I always wore dresses made from these "flour sacks" with an apron-type covering over them called a "pinafore".
When the dresses were worn out and I could no longer wear them I, many times, saw pieces of them in one of my grandmother's quilts.
She also taught me to embroidery using a white flour sack as a pillow case We stamped a pattern of a beautiful gypsy girl on it, I placed it in the wooden embroidery hoops and, using various colored embroidery thread, began to sew. I worked on it for hours and when it was time to go to bed, to my utter horror, I realized I had sewn every last stitch to my pinafore!
This poem reminded me of the many things I miss about daily, life living on a farm, back in the 40's.
The Flour Sack
In that long ago time when things were saved,
When roads were graveled and barrels were staved,
When worn-out clothing was used as rags,
When there were no plastic wraps or bags,
And when the well was way out back,
A versatile item was the flour sack!
Pillsbury's Best and Gold Medal too,
Names stamped proudly in purple and blue.
The string sewn on top was pulled and kept,
The flour was emptied and spills were swept,
The bag was folded and stored in a stack,
Oh, that durable, practical flour sack!
For a pillow, it was filled with feathers or down.
Or it could make a baby's sleeping gown.
It might carry a book and be a school bag,
Or become a mail sack, slung over a nag.
It made a very convenient pack,
The adaptable, cotton flour sack!
Bleached and sewn, it was dutifully worn,
As a bib, a diaper, or a kerchief, adorned.
It was made into a petticoat, shirt, or slip;
Granny braided rugs from its torn strips.
Yes, Mama ruffled curtains for our little shack
From that humble but treasured flour sack!
It made a strainer for milk or orange juice,
To summon a person was a very good use.
As a sling for a sprained wrist or a break,
Or to help Mama roll out a jelly cake,
Even as a window shade or to stuff a crack,
We used a sturdy, common flour sack!
It became a dish towel, embroidered or not,
To cover bread dough, help with pans too hot,
Or to tie up victuals for neighbors in need.
Men used it in the fields, to carry the seed.
We could not do without it, that is a fact,
Oh, that absorbent, grand old flour sack!
Saturday, November 29, 2008
GOBBLER COBBLER & Croquettes
 Tired of the same ole things for the turkey leftovers? Me too, so I found some really great recipes for a new twist on old dishes. I love tomatoes so when I came across this recipe with dried tomatoes in it, I knew it was a "must do" this year.
My grandmother made great croquettes, but I found a recipe that bakes them, which is much healthier than frying, and a sauce that really sets them apart.. Here they are and I think you and your family will acquire a new appreciation for leftovers with these tasty new ways to disguise them..
GOBBLER COBBLER
2 1/2 cups turkey gravy (leftover or commercially prepared, I used the broth from the cooked turkey)
3 cups cooked turkey chunks
1 1/2 cups frozen peas
1 1/2 cups sliced mushrooms
2/3 cup dried tomato bits ( I run the halves through my Cuisinart food processor)
1/4 cup water
2 tablespoons chopped parsley, divided
1 teaspoon poultry seasoning, divided
2 1/4 cups reduced-fat buttermilk baking mix
1/4 teaspoon coarsely ground pepper (1/4 to 1/2)
3/4 cup plus 2 tablespoons low-fat milk
Preheat oven to 450 degrees F.
In3-quart saucepan combine gravy, turkey, peas, mushrooms, tomato bits,water, 1 tablespoon of the parsley and 1/2 teaspoon of the poultry seasoning. Stir occasionally over medium-low heat until mixture comes to a boil.
Meanwhile, in bowl combine the baking mix, the remaining parsley and poultry seasoning, the pepper and milk; mix just to blend thoroughly.
Pour turkey mixture into shallow 2-quart casserole or 9-inch square baking dish. Top with baking mix mixture,dropping with spoon in six equal mounds. Place on baking sheet and bake about 20 minutes until turkey mixture is bubbly and topping is golden brown
NOTES: I used 2 cups self-rising flour, 1 stick melted butter, and 1 cup of buttermilk and used this for my topping instead of the called for ingredients in the recipe and baked it at 425 degrees instead of the 450.
OLD FASHIONED BAKED TURKEY CROQUETTES
Thick Cream Sauce:
4 tbsp. butter
1/3 c. flour ( for medium cream sauce add only 1/8 cup flour)
1 tsp. salt
1/4 tsp. paprika
1 c. milk
Melt butter. Add flour and seasoning; blend. Add the milk slowly, stirring constantly. Cook, stirring until mixture is very thick. cool(can be stored for several days in fridge.)
Croquettes
2 c. chopped cooked leftover turkey
1/4 tsp. salt
1/4 tsp. celery salt
1/2 tsp. paprika
1 tsp. lemon juice
1 tsp. minced parsley
1 c. thick cream sauce
1 c. fine bread crumbs
1 egg, beaten with 1 tbsp. water
1/4 c. butter
Mix ingredients in order given except crumbs and egg. Shape into 6 to 8 croquettes. Chill. Heat oven to 375 degrees.
Put shallow baking pan with butter into oven to heat. When butter is hot, dip croquette into crumbs, egg and again in crumbs.
Then place in pan, rolling to coat all sides with butter. Bake for about 30 minutes or until brown and crisp. Makes 6-8 servings.
Serve with celery pimento cream sauce.
Celery Pimento Cream Sauce:
To 2 cups medium cream sauce, add 1/4 cup chopped pimento and 1/2 cup cooked celery. Add 2 tsp. minced parsley.
Friday, November 28, 2008
TURKEY NOODLE SOUP
Black Friday, what a day! Up before dawn and out the door to go shop till ya drop! By the time you get home you're worn to a frizz-azzle and very thankful for the leftovers that are crammed in the refrigerator, but, there is still tomorrow to think about. Fall has set in with cold, blustery days and what better time to have a hearty bowl of soup?
Lentils and egg noodles combine with some leftover turkey to make a tummy warming soup with a little different taste after the holiday.
TURKEY NOODLE SOUP
2-3 cups cooked turkey, cubed
2-3 tablespoons margarine or vegetable oil
3/4 cup onion, diced
1 cup carrots, chopped
1/2 cup celery, chopped
1/2 teaspoon dill weed
1/8 teaspoon celery seed
1-2 cloves garlic
1/2 bay leaf
6-8 cups chicken or turkey broth
1/3 cup lintels
8 ounces egg noodles
Saute` onions, garlic and celery in a large pot until onions are translucent. Do not brown. Add broth, dill, bay leaf , celery seed and carrots, and bring to a boil. Reduce heat, add turkey, lentils, and egg noodles and simmer for 10 minutes. Remove bay leaf and continue cooking until lentils and noodles are done.
Saturday, November 22, 2008
BUSY DAY CHICKEN DINNER
Been shopping all day? Too tired to cook a big meal? This is a delicious casserole and takes only a few minutes to put together and a half an hour to cook. Add a salad and you can have a hearty meal on the table in an hour. All you need is some cooked chicken , left over from another meal, boiled, broiled or roasted, or even from the deli. This can be made to feed 3 or 4 people or more if need be. Just add more chicken and make in a larger casserole dish. Figure 3-4 ounces of chicken for each person. You might need to double those portions for a growing teen ;^)
Busy Day Chicken Dinner
3-4 cups cooked chicken ( I like to use boneless chicken breasts but you can use both light and dark meat)
1 can Campbell's Cream of Chicken soup
2 cups chicken broth ( if you boiled the chicken you can use that broth, or I use 1 Knorr's chicken bouillon cube in 2 cups water).
1 can of mixed vegetables
1 stick Land O Lakes butter or margarine, melted
1 cup buttermilk
1 cup Martha White self-rising flour
Salt and pepper to taste
Cut chicken into 1" cubes and spread in the bottom of a large baking dish. Spread the mixed vegetables over the chicken. Mix together the soup and broth and heat until the soup is incorporated. Adjust seasonings. Pour the soup mixture over the chicken and vegetables.
Mix the flour, melted butter and buttermilk together and pour over the top of the ingredients.
Bake at 400 degrees for 30 minutes or until biscuit topping is browned and a toothpick comes out clean when stuck into the topping..
Serve with a tossed salad and Voila! A hot tasty meal you didn't have to slave all day over.
Thursday, November 20, 2008
SOUTH OF THE BORDER.......Spanish Rice
The only thing I can remember Bigmother ( my grandmother) using cumin in was the homemade tamales she used to make or in chili, but I love the taste of it sprinkled on Corn on the cob, It's actually a member of the parsley family and one of the main ingredients in Chili powder.
Superstition has it that cumin will keep chickens and lovers from wandering and was often carried by both bride and groom throughout the wedding ceremony to insure a happy life. It's great for the digestion and also a source for iron.
Native to the middle East, cumin is a familiar taste in Tex-Mex dishes and one of my favorites is Spanish rice. This is my version of that dish.
SPANISH RICE
1-2 tablespoons. butter
1 small onion, very fine dice
1 green pepper, finely diced
1 clove garlic, crushed
1/2 tablespoon Paprika ( I use the sweet Hungarian)
1/2 to 3/4 teaspoons Cumin
1 cup long grain rice, dry
1 cup chicken broth, boiling hot
1 cup crushed tomatoes ( I use fresh when ever I can)
salt and pepper to taste ( if you use salted butter and canned tomatoes, there is enough salt in them)
saute` onion, garlic, pepper, cumin and paprika in butter just until the onions turn translucent.
Add rice and saute`, lightly, just until rice is coated with butter, DO NOT BROWN.
Add boiling broth and return to a boil.
Add tomatoes and adjust seasonings
Put all in a deep baking dish and cover tightly. Bake at 350 degrees F. for 18-20 minutes or until all liquid is absorbed and rice is dry and fluffy. I like mine a little wetter than most people and will sometimes add a little tomato juice to it after it bakes if it's too dry.)
Sunday, November 16, 2008
IN THOSE DAYS .... A Poem
It wasn't common in those days
to own a family car,And television hadn't been invented.
'Sides, there wasn't time nor money
To go traveling very far--
We did our days work and came home, contented.
Long summer evenings we all sat
with games and conversation,
or Jim came home with ball and bat
just bubbling with elation;
The home team won the noble fight,
So everything was dandy.
And sometimes, on a rainy night,
We'd pop corn or make candy.
Life was more placid in those days;
We made our recreation
Far from the city's worldly ways,
The bright lights and temptation.
Sometimes I think the children now
Are cheated of their birthright--
They haven't time and don't know how
To enjoy a family twilight.
written by Grace Luella Peterson Perry
Friday, November 14, 2008
IT'S PARTY TIME! Bacon Cheeseburger Roll-ups
This is a new twist on a favorite sandwich of young and old alike. I have always loved bacon cheeseburgers and when I saw this recipe I knew every teenager in the world plus all my other guests would love it too. I like to use my own recipe for homemade pizza dough but you can use the bought pizza dough for a really nice dish to serve at any gathering. It is especially loved by the week-end football couch potatoes and kids.
BACON CHEESEBURGER ROLL-UPS
1 lb. lean ground beef
8 slices bacon, diced
1 small onion, chopped (or a tablespoon of dried minced onion)
1/2 teaspoon garlic powder
½ lb.(8 oz.) Velveeta Cheese, cit into ½” cubes
1 pkg. (13.8 oz.) refrigerated pizza crust
Preheat oven to 400 degrees.
Cook bacon crisp and hold on the side.
Cook ground beef, garlic and onion until browned, and then drain.
Return beef to skillet and add Velveeta and crumbled bacon. Stir over low heat until cheese is completely melted.
Remove from heat and cool 10 minutes.
Unroll pizza dough onto baking sheet sprayed with cooking spray or parchment paper..Pat into a rectangle as thin as you can. 1/8" - 1/4" is great The thinner, the better. Spread the meat mixture evenly over the dough.
Roll up starting at one of the long sides.Rearrange and place on coking surface so that the seam is on the bottom.
Bake 20-25 minutes or until golden.Cut diagonally into slices to serve.
Meal size: Cut into 6 slices
Appetizer: Cut into 8-10 slices.
Serve with assorted condiments, if desired.
I especially like Miracle Whip with some sweet or dill pickle relish added.
Ketchup and mustard work equally well
Here are some other options when making this dish:
Use sharp shredded cheddar or any other kinds of cheese instead of Velveeta
Use a packet of Taco Seasoning added to the meat
And if you would like to make your own dough, here's a great recipe for it:
THE DOUGH:
3 c. flour
1 pkg. dry yeast, 1/4 tsp. sugar dissolved in 1/2 c. warm water
3/4-1 c. cold milk
1 1/2 tsp. salt
2 tbsp. olive oil
TO MAKE THE DOUGH:
1. Measure flour into bowl. Add yeast mixture and oil. Then add salt and cold milk, mix until forms a dough. Let rest 5 minutes.
2. Turn dough out onto a floured board. Knead 50 strokes or until smooth. Let rest 5 minutes. Knead 20 more strokes.
3. Let dough rise in a covered bowl for 1 1/2 hours or until double in bulk. Turn out onto floured board and roll out as thin as desired. Thinner is better. Cover and let rest 10 minutes.
4. As dough is rising, prepare filling
Tuesday, November 11, 2008
BREAD FOR THE NOVICE
Breathes there a wife with soul so dead; who to her husband has never said;
"This is my own real, homemade bread."
For any of you who feel you can't tackle a bread you have to knead, but still want that "homemade" flavor of yeast, here's a recipe for you!
This is a recipe from the Hardinville, IL Christian Church cookbook that will give you the homemade taste you crave and if you want it any simpler than this, ya need to make reservations at a good restaurant LOL
.
What I like about the rolls is that you prepare the batter the evening before and then can make the rolls right before your meal. They do have a nice yeasty flavor and I would give them a "thumbs up" for that as well as for ease of preparation.
SPOON BREAD
1 pkg. dry yeast ( not rapid rise)
2 cups warm water (105' to 115')
1/2 cup Land O Lakes butter or margarine, melted
4 cups Maratha White self-rising flour
1 egg, beaten lightly
1/4 cup sugar
Dissolve the yeast in warm water; let stand for about 5 minutes.It will become bubbly, which is a sign your yeast is active. If it doesn't bubble, throw it away and get fresh yeast. ( I always check the date on yeast to make sure it's still good)
Combine yeast mixture, butter and flour in a large bowl.
Stir in egg and sugar. Use an electric mixer rather than stirring by hand because you may have lumps of flour if you don't.
The mixture will be a very soft batter. Cover and refrigerate overnight.
Next day, spoon batter into greased muffin pans, filing about 2/3 full. Bake in a preheated oven at 350' for 25 minutes. Yield: 14 to 16 rolls.
When I lived in Chicago back in the "50;s" my friend's family took me with them to a place called Johney's Pizzaria", a place I had never been to before. And when I, (a country bumpkin right off the farm) never having heard of any other kind of "pie" except those you ate for dessert, was asked what kind of "pie" I wanted, I promptly replied, "chocolate". To which peals of laughter erupted from the whole family.
It was then that I tasted my first pizza, it was called 'pizza pie.' When I bit into it, I burned the roof of my mouth and the cheese slid off, swung down, plastered itself against my chin and burned that, too. It's still the best pizza I ever had.
Friday, November 7, 2008
COOKIN' THA BIRD !
MOUTH-WATERING TURKEY RECIPE
We've made the gravy, dressing and potatoes ahead and have them ready to just warm up on Thanksgiving Day. Soooooo now to cook tha bird!
If you've ever had to choke down a mouth-full of dry turkey, you'll appreciate this method for making your holiday dinner a hit! It's called "brining". And it will make your turkey the most luscious, moist, tasty bird that has ever graced a dining room table.
When you buy your turkey, make sure it's not a self-basting or Kosher one. ( some of my friends have reported they have used a Butterball and it worked fine), I prefer a fresh turkey if I can get it, but that's only for farm people. City folks will have to settle for a frozen one from the store LOL
FIRST, consider the size of the turkey you're going to cook and decide if you are going to be able to fit it into the fridge. If you can't, then you're gonna need a large cooler because you need to let the bird marinate for about 6-8 hours for a turkey up to 12 pounds and 12-14 hours for larger birds up to 20 pounds.
. Ziplock has just come out with bags that will easily accommodate the largest bird you can buy. WTG ZIPLOCK!! The extra, extra large ones measure 2' X 2' ( 20 gal ), so that problem has been solved for us.
NEXT, calculate the amount of 'brine' you will need. The best way to do this is to put "Tom" in the ziplock bag and add enough water to completely cover him. Then take him out and measure the amount of water it took and subtract 1 ( one)quart. That is how much you will need to add salt and the other brining ingredients to.
NOW, add the amount of salt you will need for the amount of water you are going to use. DO NOT USE TABLE .SALT! Use canning salt which can be purchased in any grocery store in the canning section. Ask your grocer if you're not sure. It has to be "iodine" free. And add 1/2 cup for every 2 quarts of water you will be using. Remembering, you will also be adding a quart of apple juice to this mix along with the other ingredients, so make sure you have anough room for everything. But, if you miscalculate and have more brining solution than you need, just toss it.
Here is the list of the other ingredients you will be adding to your Ziplock bag:
Turkey Brine Recipe
2 cups brown sugar
1 quart apple juice
3 oranges, quartered
4 cloves garlic, crushed
2 Tablespoons whole cloves
1-2 teaspoons black peppercorns
1 tablespoon pickling spice
1-2 tablespoons sage
Just remember, this ain't rocket science folks. If you get a little more or a little less of any of the ingredients (except the salt lol), your turkey will still be great!
Mix all ingredients, including the turkey, in a container large enough to submerge the turkey and completely cover with brine. You must keep the turkey at a safe temperature during the brining process.You have to keep the temperature in the cooler down to less than 40 degrees during the entire brining process.That's why you might need a cooler. If your bird is too large to fit back into your fridge, pack it (and the bag it's in) in ice and keep it submerged in ice water the whole time. If your turkey is frozen to start with, you won't have to worry about replenishing ice as often. Just make sure you keep it as cold as you need to
.
I freeze water in 1/2 gallon milk jugs and use these to keep the brine cold and to weigh the turkey down so it remains submerged. I change the jugs out every few hours, so you will need to freeze 2-3 sets of jugs.
The turkey should brine for 10-12 hours. ( NOTE, BRINING TOO LONG CAN RUIN THE FLAVOR) I brined mine for about 10 hours.
Smaller turkeys require less time in the brine, ( for instance, I would brine an 8 pound turkey about 6 hours)
If you find you'd like to brine it longer the next time then you can, but keeping the time short until you see how it tastes will insure it will not be too salty.
When you are ready to cook your turkey, remove it from the brine and THOROUGHLY rinse interior and exterior with cold water until all the salt and sugar is removed. Pat dry using paper towels ( this makes the turkey have a prettier skin when baked). Discard brine and cook turkey as normal, which is
Cooler will have to be completely disinfected with bleach if you intend to use it again.
NOTES: When I cook my turkey, I loosen the skin from the meat by running my fingers under the skin all over the breast and down the legs. Then I smear a stick of soft butter under the skin all over . It is wonderful tasting!! Soooo moist and flavorful
I sometimes add a teaspoon of poultry seasoning to the stick of soft butter, but just plain ole butter will make it taste wonderful!
PS. If anyone ever has any questions you can put them in the "comments" section at the end of every post and I'll reply. ( I'm always glad to help.;-)
Monday, November 3, 2008
DELICIOUS HOMEMADE YEAST ROLLS
ICE BOX ROLLS
You can have fresh homemade rolls any time you want. Just mix up this dough, store it in your fridge, and use it, as needed, for up to 10 days. You can also cook them off and store them in the freezer until needed. Just let thaw, heat and serve. It's also another step to save time on Thanksgiving!
SCALD; 1 qt milk ( which means heat it up just to the point that it would boil.
(I like to use half evaporated milk and half whole milk if I'm making only cinnamon rolls for the "bakery" taste it gives them )
ADD: 1 cup Crisco shortening ( veg oil may be used in place of Crisco)
1 cup sugar
Cool to lukewarm (110-115 degrees)
ADD: 1 pkg. yeast ( not rapid rise)
and enough all-purpose flour to make a thin batter (6-8 cups sifted) (you're going to use more flour later)
Cover and let stand 2 hours.
SIFT & MIX INTO THIS BATTER:
2 cups flour
1 teaspoon soda
1 teaspoon salt
1 teaspoon baking powder
Mix and let rest 10 minutes, then divide dough in half to make dinner rolls and refrigerate the rest.
You can keep this dough in your refrigerator for up to 10 days, using as much as you want each time you make rolls.
Just take out as much dough as you want to use, form rolls, let rise 1 hour and bake.
TO MAKE DINNER ROLLS: ( if you use half the recipe you will get about 1 1/2 dozen rolls)
Pinch off walnut size pieces of dough, dip them in melted butter, and put 3 into each cup of a cupcake. pan,
let rise 1 hour and bake at 400 degrees F. for about 20 minutes or until browned..
TO MAKE SWEET ROLLS: ( from the other half of dough you'll get about 15 rolls)
Knead dough a few times and then roll out to a long rectangle appx. 10"X18". Spread with soft butter or margarine, and sprinkle with cinnamon (I like to use apple pie spice) and if you like raisins or nuts in your sweet rolls, sprinkle them on too. Roll up jelly roll style ( starting at long edge) and cut off 1 1/2" slices.
Lay each slice, side by side on a greased cookie sheet pan.
LET RISE 1 hour. Bake at 400 degrees F. about 20 minutes or until brown. When done, immediately drizzle icing made of powdered sugar and butter mixed together & thinned with a little milk or water, over the top of rolls.When icing has dried, take out of pan and serve or store.
*NOTE: I only use McCormmick's Siagon cinnamon which can be found in the "Gourmet Collection" of their
spices. It is much sweeter and lends a better flavor to anything you put it in.
Saturday, November 1, 2008
MAKE- AHEAD MASHED POTATOES
Another time consuming and last minute task just before you lay the buffet table with your Thanksgiving meal is making the mashed potatoes, which is almost a staple with giblet gravy. Or any kind of gravy for that matter!
My brother wouldn't even come to the table if there were no mashed potatoes on it LOL The only things he would eat were mashed potatoes and black-eyed peas. If those weren't on the menu, he'd go to the fridge, take out the milk and drink half a gallon. That would be his supper. Unless you had made banana pudding or a chocolate cake. I used to have to hide these two desserts from him or that's all he'd eat, along with his milk. Of course all that finicky behavior disappeared when he got married (grin) His wife would cook a meal and if he ate it that was OK, and if he didn't, that was OK too. Now, he eats anything you put in front of him. It's amazing how marriage changes people! ;-)
MAKE-AHEAD MASHED POTATOES
5 lbs potatoes, ( Russet or Yukon Gold) peeled, cooked and mashed
6 ounces plain cream cheese
8 ounces sour cream
½ cup milk
2 teaspoons onion powder
ground Tellicherry black pepper and salt to taste ( I use Celtic sea salt exclusively)
Combine mashed potatoes, cream cheese, sour cream, milk, onion powder and salt & black pepper. Mix well and place in large casserole. You can make these several days ahead and store in refrigerator.
When ready to use, cover and bake at 325 degrees for 50 minutes.
If baking cold, let stand at room temperature for 30 minutes first.
And if you're making instant potatoes? Here's another great way to make them.
3 cups Idahoan instant potato flakes
3 cups chicken broth (boiling)
1- 8oz. container sour cream
1 stick butter (Land O Lakes)
Sea salt and pepper to taste
Onion powder (optional)
Combine chicken broth and butter and bring to a boil. Pour into potato flakes and mix well. Add sour cream, stirring to mix well. Add salt and pepper to taste. More broth may be needed if potatoes are too thick. NOTE: I usually add 1 teaspoon onion powder.
Next time I'll give you a great dinner roll recipe. And you can even make Cinnamon rolls for breakfast with it. It's another time saver for you on Thanksgiving Day!!
Friday, October 31, 2008
There is never enough gravy!
Not for me anyway, Thanksgiving is almost here and Christmas is just around the corner! It's about this time of year when everyone is trying to get in gear and get things done . So today I'm going to give you a boost up on the holidays. What takes a lot of time in the kitchen are those last minute finishing touches we all try to make as quickly as we can so we can get that beautifuly cooked turkey and dressing and all the side dishes on the table and dig in.
Here's a recipe that is going to make your day in the kitchen a lot easier and take care of that problem we all sometimes have. It seems there is never enough gravy! This is a way to have as much gravy as you want and still have enough to make dressing too. It's called................
drum roll please........................................
MAKE AHEAD GRAVY
It can be made in advance and be kept in the freezer until you need it. Then all you have to do is put it in the fridge a couple of days before you need it to thaw out and warm it up on Thanksgiving day.
You'll need about 4 big turkey wings ( I use Purdue Farms poultry)
2 onions, chopped
8 cups chicken broth ( I only use Knorr's boullion cubes to make the broth so you'll need 4, since 1 cube makes 2cups broth) You can also use canned broth but for me it's not as strong flavored as the Knorr is.
2 or 3 carrots , chopped
3-4 ribs of celery, chopped
3/4 cup flour
2-4 Tablespoons Land O Lakes butter ( or margarine)
Pepper to taste (I like Telicherry pepper so that's what I use)
Preheat your oven to 400 degrees F. and spread the turkey wings in a single layer in a large roasting pan. Spread the chopped onion over them and roast about 1 hour and 15 minutes, or as long as it takes to get the wings browned nicely. Wings are done as soon as the internal temperature of the thickest part of the meat reaches at least 165 degrees F.
I use my Hamilton Beach 7 qt. slow cookers for the next step but you can use a large pot on top of the stove if you like. A stock pot works well.
Put the cooked wings and onions and all the scrapings along with the carrots and celery into the pot and add 6 cups of the broth. (put the remainder of the broth in the fridge to get cold) Bring everything to a boil and simmer for about 2 hours.
Next, remove the wings from the pot and save them on the side so you can take off the skin and collect all the meat. Once you have done that, save the meat for another use.
I, make Turkey salad with mine.
Next, strain the broth and get as much of the juice out of the vegetables as you can. Then put it in the fridge and leave overnight if you want to get all of the fat out.
Next day, the fat will lift right off the gelled broth and you can scrap off any unwanted residue from the bottom that settled as it cooled. Now you have some of the best tasting clear broth, with which to make gravy, you have ever tasted!
Next, put about half a stick of butter into a saucepan, melt it and add the 3/4 cup of flour. Turn the heat to low and while stirring constantly, cook it slowly until it's just a light golden tan. ( this is called a blond roux)
Then take the 2 cups of cold broth you had put in the fridge and add it to the roux, stirring constantly. as soon as you have that mixed well, add the rest of the broth and cook on low until it thickens. Stir in pepper. to taste.
Pour into freezer containers and freeze for up to 6 months.
Now you have about 8 cups of delicious gravy ready to use on Thanksgiving Day already made and only needing to be thawed out, warmed up and served.
When the turkey is done, if you have cooked the giblets also, you can slice them and add add them to your gravy when it is heated up along with about 4 sliced hard-boiled eggs. I doubt you'll need any extra salt as the Knorr boullion cubes are salty enough, but if not, add salt to taste now.
Tomorrow I'll post another time saving recipe.
Thursday, October 30, 2008
TO ALL THE KIDS WHO WERE BORN IN........
THE 1930's 40's, 50's, 60's and 70's !!
First, we survived being born to mothers who smoked and/or drank while they carried us.
They took aspirin, ate blue cheese dressing, tuna from a can, and didn't get tested for diabetes.
Then after that trauma, our baby cribs were covered with bright colored lead-based paints.
We had no childproof lids on medicine bottles, doors or cabinets and when we rode our bikes, we had no helmets, not to mention, the risks we took hitchhiking .
As children, we would ride in cars with no seat belts or air bags.
Riding in the back of a pick up on a warm day was always a special treat.
We drank water from the garden hose and NOT from a bottle.
We shared one soft drink with four friends, from one bottle and NO ONE actually died from this.
We ate cupcakes, white bread and real butter and drank soda pop with sugar in it, but we weren't overweight because......
WE WERE ALWAYS OUTSIDE PLAYING!!
We would leave home in the morning and play all day, as long as we were back when the streetlights came on.
No one was able to reach us all day. And we were O.K.
We would spend hours building our go-carts out of scraps and then ride down the hill, only to find out we forgot the brakes. After running into the bushes a few times, we learned to solve the problem .
We did not have Playstations, Nintendo's, X-boxes, Or Wii! No video games at all, no 99 channels on cable, no video tape movies, no surround sound, no T-Mobile cell phones, no personal Dell computers, no Internet or Internet chat rooms..........WE HAD FRIENDS and we went outside and found them!
We fell out of trees, got cut, broke bones and teeth and there were no lawsuits from these accidents.
We ate worms and mud pies made from dirt, and the worms did not live in us forever.
We were given BB guns for our 10th birthdays, made up games with sticks and tennis balls and although we were told it would happen, we did not put out very many eyes.
We rode bikes or walked to a friend's house and knocked on the door or rang the bell, or just yelled for them!
Little League had tryouts and not everyone made the team. Those who didn't had to learn to deal with disappointment. Imagine that!!
The idea of a parent bailing us out if we broke the law was unheard of. They actually sided with the law!
This generation has produced some of the best risk-takers, problem solvers and inventors ever!
The past 50 years have been an explosion of innovation and new ideas.
We had freedom, failure, success and responsibility, and we learned
HOW TO DEAL WITH IT ALL!
And YOU are one of them!
CONGRATULATIONS!
You might want to share this with others who have had the luck to grow up as kids, before the lawyers and the government regulated our lives for our own good. And while you are at it, mention it to your kids so they will know how brave their parents were.
Kind of makes you want to run through the house with scissors, doesn't it?!
Hope you enjoyed this walk down memory lane, I did.
Do you wish you had saved your grandma's recipes?
I did! and now I am going to share them, and some new ones, with you. But first, let me tell you a bit about myself.I learned to cook standing in a chair next to my Bigmother's kitchen table scrutenizing every move she made and begging to "lick the bowl" when she was through mixing up whatever she was cooking. Especially when what she was cooking was a cake, or a pie or some other delectable sweet I loved. It always seemed to me that she scraped that bowl out wayyyy too good and I feared nothing would be left in it for me.I questioned every move she made and every ingredient she added with, "Why're you doing that Bigmother"? and "What's that for"? By the time I was 11 years old I had learned enough to cook my first meal, under her supervision of course. Back then, we're talking "40" here folks, I don't think they even made canned spaghetti sauce and if they did, we never bought any. Everything was made fresh, from "scratch" as we say now, right from our garden. Even though my Bigdaddy raised hogs and tobacco, he still planted a garden every year and the only things we bought from the Kroger grocery store were the staples like flour, sugar, stone-ground cornmeal and canned milk even though we had a cow. My spaghetti dinner turned out great, even though I cooked the pasta to a mush LOL But she let me make that mistake to teach me the importance of cooking all the dishes at the right time so that they were done together. And I think that was when my love affair with food and cooking began. So if you have any funny stories about cooking you'd like to share with me, I'll share a few of mine with you and we'll take a walk down memory lane together. It should be a blast!
Subscribe to:
Posts (Atom)