


Southwestern Taco Triangles
Perfect for New Years Day! Individual taco triangles.These little jewels will be a sure-fire hit with your football couch potatoes. Serve them warm with a dish of picante sauce and watch them disappear.
Ingredients:
1 pound ground chuck
1/2 cup onion, minced
2 tablespoons veg oil
1 can (16 ounces)Taco Bell refried beans
1-1/2 cups (6 ounces) shredded cheddar cheese
1 cup Pace picante sauce
1 can (4 ounces) diced jalapeno peppers, drained
2 packages (12 ounces each) wonton wrappers
Oil for deep-fat frying
Additional Picante sauce for dipping
Directions:
Saute` the onion in the oil and add the ground chuck. Cook just until done, do not brown. Add salt and pepper to taste and drain. Add the beans, cheese, picante sauce and
jalapenos. Cook and stir over low heat until the cheese is melted. Remove from heat; and when cool,
In the center of each wonton wrapper, place a level tablespoon full of the ground chuck mixture. Moisten all edges with a little beaten egg.. Fold each wonton in half, forming a sealed triangle.
Deep-fry in 375° degree oil, a few at a time, for 2-3 minutes or until golden brown. Drain on
paper towels. football couch potatoes. Yield: about 7-1/2 dozen.
Wednesday, December 31, 2008
Chocolate Cake Christmas Trees
 Chocolate cake Christmas Trees
I used a large foil roasting pan and cut holes about 2" round in the bottom in alternating rows, leaving 1-2 inches in between the holes. Then I turned it upside down and put cone shaped paper cooler cups in the holes to hold them upright during baking. You want the cups to be in the holes about 2/3 of the way down so they won't tip from being top heavy when pouring in the chocolate cake.
Chocolate Cake ( this is a very thin batter)
1 Cup Butter (2 Sticks) No substitutions.
6 TBS Cocoa ( I use Hershey's special blend with the dutch cocoa mix)
1 Cup Water
2 Cups Sugar
1 Tsp Baking Soda
1/ 2 Tsp Salt
2 Cups Flour
2 Eggs
1/2 Cup Sour Cream
Boil butter, cocoa and water. Stir in sugar. Remove from heat. Beat. Cool slightly.
Add flour and the rest of the ingredients. Beat.
Pour the batter ( which is very thin) into the cups and bake at 350 degree F. until a toothpick inserted in the center of the cake comes out clean. and the cake feels firm to the touch, 25-30 minutes
Let the cakes cool completely in the pan. When cakes are cool place them in the freezer for 3 hours then peel off the paper being careful not to tear off the tip of the tree. . Place cakes on a rack over a sheet pan lined with waxed paper and pour a white chocolate ganache` over them to frost.
White chocolate ganache`
melt 12 ounces of white chocolate or white chocolate chips with 2 cups heavy cream in a double boiler. take out 1 cup and set aside. Color the rest with a few drops of green paste food color. Pour the green ganache` over the trees letting the excess drip off onto the waxed paper. Then put the reserved white chocolate ganache` into a ziplock bag, cut off the tip of the corner and pipe a garland around each tree. Then stick on red hot candies and silver dragees to look like ornaments.
NOTES: You can also frost the trees in white and make green garlands and use M&M's or any kind of candy you desire to decorate your trees. These are great for kids parties, they love 'em!
Saturday, December 27, 2008
New Year's Day, Fast and Easy Strudel
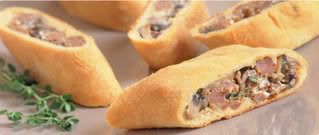 Here's a great finger food for the guys on New Year's day to munch on while watching the game.
Some condiments can be added for dipping such as picante sauce or salsa, hot mustard, mayo, or even a thick white gravy.
MUSHROOM SAUSAGE STRUDEL
1/2 lb. mild or hot ground pork sausage
1/2 lb. mushrooms, chopped
1/2 tsp. dried thyme, crumbled
1 tbsp. Dijon Mustard
1/4 cup Sour Cream
1 package (8 oz.) refrigerated crescent rolls
1.Preheat oven to 350°. Place rack in upper third of oven.
2.To make filling, in a medium nonstick skillet, sauté sausage over moderate heat, breaking up with a spatula until cooked through and crumbled. Drain off fat. Add mushrooms and thyme and sauté over high heat until all liquid has evaporated and mushrooms begin to brown, about 5 minutes. Remove from heat and stir in mustard and sour cream.
3.Remove half package of rolls and place on a lightly floured board. Press together at perforations to seal the dough together.
4.Spoon half the filling down the center of pastry. Fold pastry over and roll up. Crimp ends.
5.Transfer to an ungreased baking sheet, seam side down. Repeat with remaining filling and rolls.
6.Bake for 14 to 18 minutes or until golden. Remove from oven and cool slightly.
7.Transfer to cutting board and slice into 1-in. pieces.
Wednesday, December 17, 2008
Every cook, at some time, decides to make a pie. For me, the crust is the backbone of the pie, and for most cooks, it's the hardest to achieve.Pie crust was my nemesis for many years, until I finally decided I was going to get it right if it hair-lipped the governor!
Enter, the Pie Chef.! The, in my opinion," guru" of pie crusts. She has gotten themdown to a science and I'm gonna tell ya how to do it for a no-fail experience.She taught me that the exact ingredients are the mos timportant thing,and the next most important thing is to sift the flour before and after measuring it.Doing those two things will almost gar-awn-tee you'll get a perfect product every time.
So,we'll start with the crust. The most common, and the one my grandmother always made, was one with shortening (she used lard then, but Crisco is what most people use now. I like to use a mixture of the two and it can be purchased in most grocery stores. It will say, " a mixture of vegetable and animal fats".Whichever one you want to use is fine for this crust, plain flour ( my personal choice is Martha White) and iced water. Just those three ingredients.
Here are the measurements for one crust:
1 1/2 cups flour
1/2 cup Crisco
dash salt
3 tablespoons ice water
for a double crust:
2 1/4 cups flour
3/4 cup Crisco
dash salt
4 1/2 tablespoons ice water
for two crusts:
3 cups flour
1 cup Crisco
dash salt
6 tablespoons ice water
actually the "secret" to flaky crust is trapping the pieces of cold shortening between the layers of flour that have been moistened with iced water.To obtain that "flakiness" which is what we all desire, I suggest you chill the shortening before making the pie crust and use iced water..When I make pie crust I chill the shortening to get it hard enough to be cut into little pea-sized pieces, and cut it in with a food processor or a pastry cutter until the shortening is the size of peas.
Now don't laugh at this next instruction cause it works really well.( if you try it you'll see it does) I use a "sippy cup", the kind that has the little snap on lid that lets the liquid out slowly when a child drinks from it.( it works almost like a salt shaker) I measure the amount of water I'm using for ever how many crusts I'm making, and once I have the shortening cut into the flour, I sprinkle the required amount of water into that mix, tossing with a fork as I do so. Then I put it all in a ziplock bag and mash it together into a ball. Next I put it back into the fridge for about 5 minutes to make sure it's cold.( this keeps those little pea-sized pieces of shortening hard)Then I roll it out and put it in my pie pan, pop it into the freezer for 10 minutes and then bake as directed. The crust comes out flaky every time. I know this is a lot of pains to go to, but if you really want a flaky crust, it works! Try it sometime.
NOTES:
1. I always bake pies in the middle of my oven and I only use pyrex pie baking dishes, and the bottom crust is always nice and brown. But any pie pan will work. Pyrex just works better for me.
2. When I roll out a pie crust, I do so between two layers of plastic wrap. Then it's very easy to turn it into my pie plate and the plastic peels off easily once it's in there.
3. If, like me, you don't have kids..... try confiscating one of those "sippy cups" from a niece or nephew like I did LOL! You'll find it facilitates getting that iced water sprinkled in evenly and not having one big blob of dough that is wet and other parts that are bone dry.
4. The amount of water specified is just a guideline. The amount of humidity in the air will determine how much you really need. But the smaller the amount of water used, the flakier the crust will be.
HERE ARE THE AMOUNTS FOR A BUTTER CRUST, WHICH I FIND TASTE REALLY GOOD WHEN MAKING A FRUIT PIE.
AMOUNT FOR 1 CRUST
1 13 cups flour
1 stick cold butter
dash salt
2 2/3 tablespoons ice water
for a pie with a top crust:
2 cups flour
1 1/2 sticks cold butter
dash salt
4 tablespoons ice water
I use the butter frozen and put it in a food processor for ease of mixing, but you can do this by hand too. Cut the butter into six pieces and add to flour in processor. Pulse enough times to get the butter into pea-sized pieces. Then add required amount of iced water while pulsing again to mix. DON'T OVER MIX OR CRUST WILL BE TOUGH
Another really good crust that goes great with a pumpkin pie is made using whole wheat flour. Here are the amounts for it.
WHOLE WHEAT CRUST FOR PUMPKIN PIE
for 1 crust
1 1/2 cups whole wheat flour
1/2 cup Crisco
dash salt
3 tablespoons ice water
for 2 crusts, double all ingredients
Process as with other crusts
And,finally, the meringue (or calf slobbers, as my grandpa used to call them). There are so many different ways to make meringue that I'm only going to give you the way I make mine which always stay pretty after the pie is done. First, remember to put meringue on top of a hot filling, Next, remember to seal it to all edges of the crust. And last,cook it at 350 degrees for about 20-25 minutes until brown. Here are the ingredients:
MERINGUE
3-4 egg whites
1/2 teaspoon baking powder
1/4 teaspoon cream of tartar
dash of salt
3-4 tablespoons sugar for each white
Combine all ingredients except sugar and mix until frothy peaks form when beaters are lifted out of the whites.Add the sugar, one tablespoon at a time while beating until all is incorporated. Spread on top of pie and bake.
VOILA`, a beautiful, tasty, pie! and don't cut it until it's cold so the filling will be firm
Friday, December 12, 2008
The Riddle of the Runny Pie
Nothing can be more embarrassing than to make a beautiful custard pie and, when you cut into it, to discover the filling, that was just the right thickness when you poured it into the beautifully browned crust, has now turned into a runny liquid mess! You've made that pie a hundred times and are sure the ingredients were fresh and accurate. Well, my friend, you have been visited by the enzyme amylase thieves! These sneaky little culprits, who live in the yolks of eggs, have gobbled up all the starch in your pie.
Egg yolks must reach a temperature of over 140 degrees F or the thickening they provide actually reverses itself due to the enzyme amylase in them, which attacks the starch, unless it's deactivated by adequate heat. In other words, you must bring the custard to a boil to destroy these enzymes. I realize it's much easier to cook custard in a double boiler, which allows you to do other things at the same time because you don't have to stand over it to keep it from scorching. But you have to bring it to a boil and the double boiler will just not let you do that.
When I make a cream pie I put all but 1 cup of the milk that is required into a pot and let it start to heat up as I mix the sugar, egg yolks and cornstarch together. Then I add the cup of cold milk to the egg yolk mixture and, while whisking constantly, slowly pour that into the heating milk. I continue to stir with a whisk until the custard comes to a boil and is thick. Then I remove it from the heat and add the butter and flavoring and pour it into my already browned crust. I quickly beat the whites for the meringue and pour them on top of the hot filling, making sure it touches the crust all the way around. Then I bake the meringue at 350 degrees F. for 25-30 minutes or until nicely browned.
Tuesday, December 9, 2008
Do you FONDUE?
 Well, do you? Keeping the conversation flowing at any kind of gathering is sometimes the hardest thing for a host/hostess to achieve. There are always some guests, who just can't mingle with others, who stand like wallflowers on the sidelines of conversations. Nothing gets people talking and interacting better than a "fondue party" to keep the conversation rolling and even the shyest guest will feel at ease once they pick up a fondue fork. So if you're having a gathering of people, who aren't acquainted or find it hard to join in the fun, Fondue is the very best "ice breaker" there is. Do keep the "pot" full and have plenty of food to dip.
You can buy a fondue pot or two, or just set a heatproof bowl on a warming plate. You can cook tiny pieces of meat in broth, or just dip various foods in a great sauce or chocolate. The things you can do with fondue are limited only by the imagination of the hostess. Here are some basic fondue recipes that are sure to please and turn a dull party into a really fun way for people to get acquainted.
Parmesean Fondue
1 1/2 cups milk
2- 8 oz packages of Philadelphia cream cheese- cubed
1 1/2 c grated parmesan cheese
1/2 tsp garlic salt
Various foods suitable for dipping.
Don't use anything that will crumble or break off into the fondue. Use 1" cubes of french bread, cauliflower, boiled baby potatoes, celery, meatballs, little smokie sausages. Be sure everything is cut into bite-sized pieces for dipping. Have fondue forks available or use toothpicks to spear each piece of food.
In a pan, heat milk and cream cheese on low heat untill smooth (do NOT boil). Stir in parmesan cheese and garlic salt, and heat till smooth (do NOT boil). Transfer to a small crockpot, or fondue pot to serve.
This can be made a day prior to your party , and heated in the crockpot on low.
A great taste sensation is pieces of angel food cake or fruit dipped in a plain or flavored chocolate. Here are two delicious combinations.
White Chocolate/Amaretto fondue
for each pound of Kraft white chocolate, grated or Nestles white chocolate chips, use 1 cup heavy whipping cream and 1 tablespoon Amaretto liquor.
Mix liquor and cream in a double boiler over simmering, but not boiling, water. Add the chocolate and Stir until all chocolate is melted. Transfer to a fondue pot and surround with bite-sized pieces of angel food cake, bananas, strawberries, pineapple, cantelope or other suitable fruit.
Dark chocolate/orange flavored fondue
For each pound of Kraft chocolate bark, grated or Nestles chocolate chips, use 1 cup heavy whipping cream and 1 tablespoon Grand Mariner liquor.
Mix liquor and cream in a double boiler over simmering, but not boiling, water. Add the chocolate and stir until all chocolate is melted. Transfer to a fondue pot and surround with bite-sized pieces of angel food cake, bananas, strawberries, pineapple, cantelope or other suitable fruit.
NOTE: more liquor may be used to taste or omitted altogether if desired.
Saturday, December 6, 2008
THE SMILE
A
but gives much. It
enriches those who receive,
without making poorer those who
give. It takes but a moment but the memory
of it sometimes lasts forever. None is so rich or
mighty that he can get along without it, and none is so
poor but that he can not be made rich by it. A smile creates
happiness in the home, fosters good will in business, and is the
countersign of friendship. It brings rest to the weary, cheer to the dis-
couraged, sunshine to the sad, and it is nature's antidote for trouble. Yet
it cannot be bought, begged, borrowed, or stolen. For it is something that is of
no value to anyone until
it is given away ~ Some
people are too tired to
give you a smile. Give
them one of yours, as
no one needs a smile so
much as he who has no
more to give.
smile
costs nothingbut gives much. It
enriches those who receive,
without making poorer those who
give. It takes but a moment but the memory
of it sometimes lasts forever. None is so rich or
mighty that he can get along without it, and none is so
poor but that he can not be made rich by it. A smile creates
happiness in the home, fosters good will in business, and is the
countersign of friendship. It brings rest to the weary, cheer to the dis-
couraged, sunshine to the sad, and it is nature's antidote for trouble. Yet
it cannot be bought, begged, borrowed, or stolen. For it is something that is of
no value to anyone until
it is given away ~ Some
people are too tired to
give you a smile. Give
them one of yours, as
no one needs a smile so
much as he who has no
more to give.
ppppppp
Wednesday, December 3, 2008
The Versatile Flour Sack
One of the most common things around the kitchen when I was growing up were flour sacks. We grew, and 'put up", everything we ate except for a few staples.
Every Saturday we went to town where the women shopped for the things they needed and the men gathered around the Courthouse "square" where they traded livestock and swapped stories while the kids played on the Courthouse lawn.
My grandmother bought 10 and 25 pound bags of flour that came packaged in large squares of gaily printed cotton fabric. When we got home, the flour was stored in a can in the pantry. The sack was then washed and used for many things, including clothes. I always wore dresses made from these "flour sacks" with an apron-type covering over them called a "pinafore".
When the dresses were worn out and I could no longer wear them I, many times, saw pieces of them in one of my grandmother's quilts.
She also taught me to embroidery using a white flour sack as a pillow case We stamped a pattern of a beautiful gypsy girl on it, I placed it in the wooden embroidery hoops and, using various colored embroidery thread, began to sew. I worked on it for hours and when it was time to go to bed, to my utter horror, I realized I had sewn every last stitch to my pinafore!
This poem reminded me of the many things I miss about daily, life living on a farm, back in the 40's.
The Flour Sack
In that long ago time when things were saved,
When roads were graveled and barrels were staved,
When worn-out clothing was used as rags,
When there were no plastic wraps or bags,
And when the well was way out back,
A versatile item was the flour sack!
Pillsbury's Best and Gold Medal too,
Names stamped proudly in purple and blue.
The string sewn on top was pulled and kept,
The flour was emptied and spills were swept,
The bag was folded and stored in a stack,
Oh, that durable, practical flour sack!
For a pillow, it was filled with feathers or down.
Or it could make a baby's sleeping gown.
It might carry a book and be a school bag,
Or become a mail sack, slung over a nag.
It made a very convenient pack,
The adaptable, cotton flour sack!
Bleached and sewn, it was dutifully worn,
As a bib, a diaper, or a kerchief, adorned.
It was made into a petticoat, shirt, or slip;
Granny braided rugs from its torn strips.
Yes, Mama ruffled curtains for our little shack
From that humble but treasured flour sack!
It made a strainer for milk or orange juice,
To summon a person was a very good use.
As a sling for a sprained wrist or a break,
Or to help Mama roll out a jelly cake,
Even as a window shade or to stuff a crack,
We used a sturdy, common flour sack!
It became a dish towel, embroidered or not,
To cover bread dough, help with pans too hot,
Or to tie up victuals for neighbors in need.
Men used it in the fields, to carry the seed.
We could not do without it, that is a fact,
Oh, that absorbent, grand old flour sack!
Subscribe to:
Posts (Atom)